Hatching Time Quail Brooder Review From a Working Hatchery
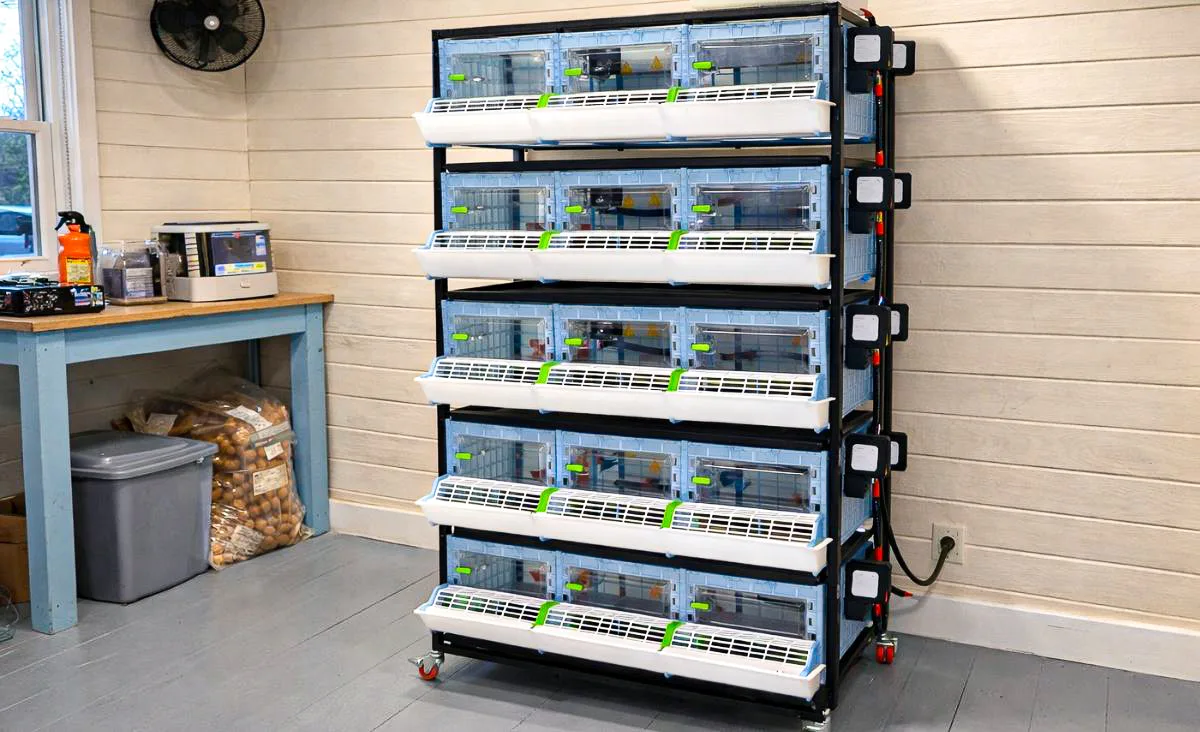
I started raising Coturnix quail in 2013, and after a lot of trial, error, and rebuilding, I have gotten pretty picky about brooders. In my hatchery here in Maine, the Hatching Time quail brooder is the only brooding system I use. I have five brooder units stacked in one tower, they take up a little over 6 square feet, and I can comfortably start about 200 day-old chicks across all five layers in that footprint.
That number does not stay the same for long, which is an important detail. As the chicks grow, I reduce the number in each layer. By the third week, when mine are usually coming off heat, I am down to about 20 to 30 chicks per layer. That shift matters because a brooder that works well on hatch day can become crowded fast if you do not have a clear plan for the next two to three weeks.
I use the Hatching Time quail brooder because it keeps my brooding setup compact, clean, and predictable. In this review, I’m going to show you how I use it, what works well for me, and what I think you should know before you buy one.
Why This Brooder Works Well for Quail Chicks
What I like most is that it gives the chicks steady warmth without using a heat lamp. I do not use heat lamps in my hatchery because they are not a safe option, and I prefer this system over stock tanks with heat plates because I feel much more confident in the overall warmth of the space. That matters with quail chicks. They are tiny and they chill fast.
What I want to see is simple. I want chicks using the whole brooder instead of piling in one spot. I want clean feet, dry fluff, easy access to feed and water, and no escapes. That is what I get with this setup. Because there is no loose bedding in the brooder, I also do not have to deal with chicks kicking shavings into feed and water all day, which is a constant annoyance in other systems.
Space is another reason I like this setup. Floor space disappears fast when you hatch in batches, and the ability to stack units lets me brood a lot of chicks in a small footprint. If you are only hatching a few quail once in a while, this may be more system than you need. If you are hatching regularly or want a brooder that scales neatly, it makes a lot of sense.
How I Use it from Hatch Day Through Week Three
This is the part I think people need most. The brooder is only part of the story. What really matters is how it handles those first few fast-growing weeks.
Week One Setup
For the first week, I use the floor mats that come with the brooder over the plastic grid floor. That gives the chicks a better surface underfoot while they are tiny and still getting steady on their legs. I clean those mats every day so manure does not build up and stick to their toes.

During that first week, I also use the tiny quail-chick-sized feeders and waterers that come with the system. That setup is a better fit for newly hatched chicks than sending them straight to the larger outside trough feeder and nipple waterer. It keeps everything lower, easier to reach, and more appropriate for their size.
Week Two into Week Three
After the first week, I remove the small feeders and waterers and transition the chicks to the nipple waterer and outside trough feeder. By then, they are stronger, more coordinated, and ready for the change. This is also the point where I am watching density more closely and reducing numbers as needed so they stay comfortable as they grow.
By the third week, I am usually down to around 20 to 30 chicks per layer. That is also when they are getting ready to move into grow-out pens without heat. If you leave numbers too high for too long, you will see it in crowding, more manure buildup, and chicks spending less time spread out comfortably.
Heat, Cleaning, and Daily Management
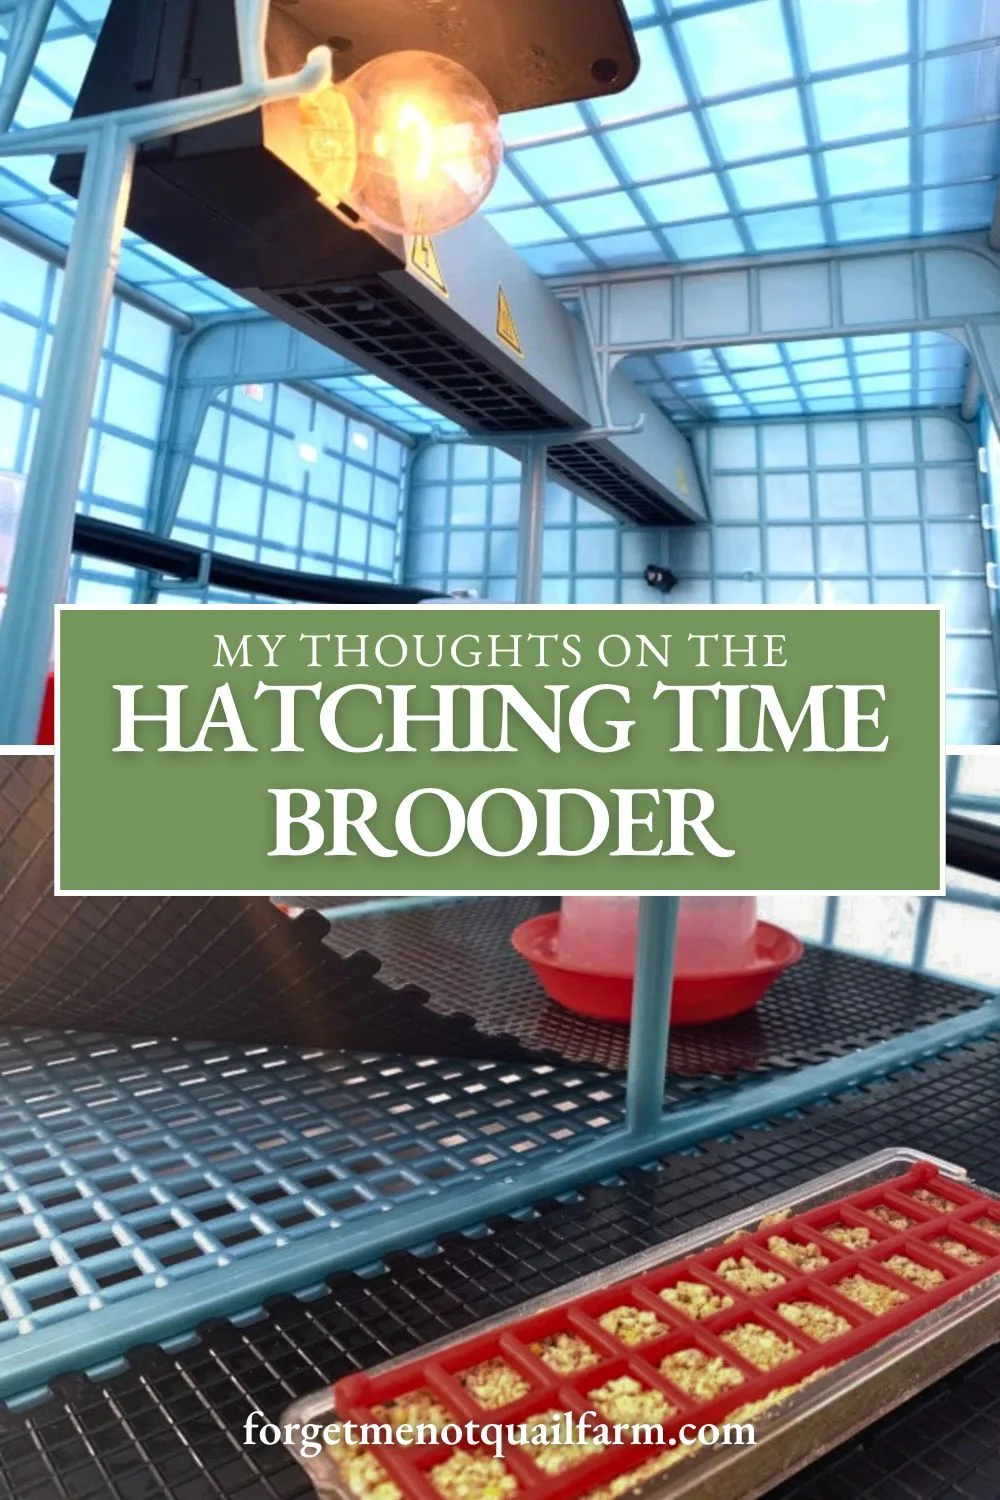
The built-in heat is one of the main reasons I use this system. One thing I should mention is that these brooders may need incandescent light bulbs to help maintain heat if the room they are in drops below 50°F. In my unheated hatchery, especially with early spring hatches here in Maine, that matters. Incandescent bulbs are getting harder to find, but I have had good luck with 40-watt rough service shop bulbs from Amazon. They have worked well for me and held up better than standard bulbs when chicks start pecking and messing with them.

Older versions of these brooders show temperature in Celsius, so if you are reading the unit and comparing it to general brooding advice, it helps to have both side by side.
Quail Brooder Temperature Guide
Here is a simple starting point for Coturnix quail chicks, but not the whole answer. If chicks are clumping tightly, they are too cold. If they are avoiding the warmest area and looking stressed, they may be too hot. When they are comfortable, they spread out, move around normally, and rest without piling.
- Week 1: 95°F / 35°C
- Week 2: 90°F / 32°C
- Week 3: 85°F / 29°C
- Week 4: 80°F / 27°C, if heat is still needed
My Cleaning Routine
I spot clean daily. I do a full cleanout of the manure trays one or two times per week, depending on how many chicks are in each layer and how messy that batch is. In the first week, daily cleaning of the floor mats is part of the routine too. It takes a little more time, but it helps prevent manure from sticking to their feet.
One thing I still appreciate about this Hatching Time brooder is that I can remove the heating element and power wash the system between hatches. That makes reset days much easier, especially when I am turning one batch over and getting ready for the next.
If you like having a checklist in front of you, the free Coturnix Quail Brooding Checklist in the Resource Library is a good fit for this stage.
What I Like Most + What You Should Know Before Buying One
For me, the biggest benefits are the heat, the cleaner brooder, and the small footprint. For quail chicks, those three things solve a lot of problems before they start. I also like that it removes bedding from the equation during brooding. In a bedding-based setup, chicks have a talent for scratching litter into everything. This system cuts down on that mess, keeps feed and water cleaner, and gives me clean feet on the chicks.
There are a few things you should know before you buy one. The first is cost. This is not the cheapest way to brood quail. The second is that you still need to manage density carefully as chicks grow. A brooder can be roomy on day one and crowded by the end of week two if you are not paying attention. The third is that assembly can feel awkward the first time. Once you have done one, the rest go much faster.
The first time I assembled one, I found this setup video helpful.
If you hatch quail regularly and want a compact brooder that is easy to clean, this is an excellent system. If you are only hatching a tiny batch once a year, you may decide a simpler brooder is enough. If you want a system you can use over and over with less mess and better organization, this one has been worth it for me.
If you run into temperature, crowding, or early chick behavior problems, it helps to understand the common brooding problems and how to fix them. And once your chicks are eating steadily and growing well, knowing what to feed quail chicks as they grow becomes the next important piece.
Frequently Asked Questions
These are the ones I think matter most if you are trying to decide whether this brooder is the right fit.
That depends on age. In my hatchery, five stacked brooders can comfortably start about 200 day-old chicks total. As the chicks grow, I reduce numbers in each layer. By week three, I am usually down to around 20 to 30 chicks per layer before moving them into grow-out pens.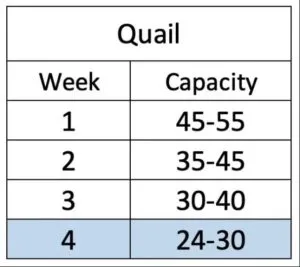
For the first week, yes, I use them and would recommend them. They give tiny chicks a better surface and help prevent problems with manure sticking to their toes. I clean them daily during that stage.
I use the chick-sized feeder and waterer for the first week. After that, I remove them and let the chicks use the nipple waterer and outside trough feeder that come with the system.
For me, yes. I prefer it over stock tanks with heat plates because I feel more confident in the ambient temperature, and I prefer it over bedding-based brooders because there is less mess in the feed and water. It is also more contained, which means fewer escapes and easier cleanup.
Yes! I do not use heat lamps because I do not consider them a safe option for my setup. This brooder gives me a dedicated heated environment without needing one.
It can be, especially if you want a contained system and plan to hatch more than once. I would just go into it knowing that it costs more up front than a basic homemade brooder and that you still need to manage chick numbers, temperature, and cleaning closely as the chicks grow.
This brooder has worked well in my hatchery because it keeps the brooding stage cleaner and easier to handle. It is not the only way to brood quail, but it is the one I trust enough to use across every batch I hatch.
If you are deciding whether this makes sense for you, look at how often you hatch, how much space you have, and how much cleanup you want to deal with. For my hatchery, it has been a solid long-term system.
For anyone planning to order, the code forgetmenot saves $25 on any Hatching Time purchases over $250. If you’re in Maine and looking for hatching eggs, I offer local hatching eggs.